
-
The Transition to Everymail
- Why “Free” Email Is Usually Not Free
- Your transition to Everymail
- How can I subscribe to Everymail?
- How does the free trial work?
- Why is my email service being transitioned to Everymail?
- Why do I have to pay for email now?
- What happens if I don't subscribe during the free trial?
- Is my information shared or sold to third parties?
- Can I recover my email data if I don’t subscribe by the end of the subscription period?
- How does Everymail comply with data privacy laws?
- Does Everymail mine my data?
-
My Account
-
Forgot Your Password
-
Everymail on Every Device
-
Advanced Support
-
Everymail on the Web
- How to recognize genuine Everymail emails and avoid phishing
- Everymail on the Web
- Use 2-step Verification to secure your email account
- Downloading your Personal Data
- How to change your login password in webmail
- I can't login
- How do I log in to my email?
- Create a new folder
- Move an email to a folder
- Using search in Mail
- Archiving emails
- Storage Usage
- Mark as Spam/Not Spam
- Delete an email
- Setup your email signature
- Using sort to search
- Mark as Read/Unread
- How to spellcheck emails
- Adjust the size of text
- Enabling Conversations (Visually group all messages with their replies)
- Adjust your location, time zone and language settings
- Automatically save email addresses
- How to Auto forward emails
- Organize your email with folders
- Enter your contact information
-
Billing and Payments
-
Customize Everymail on the Web
- Customize your inbox
- Unified Mail
- Adding an existing email account to Webmail
- Customize your email with themes and backgrounds
- Organize your email using filter rules
- Using Inbox Categories to organize your incoming emails
- Choose your email layout view
- Configure your quick launch icons
- Enable dark-mode
- Customize your portal
-
Address Book
-
Calendar Management
-
Tasks Management
-
Email & File Encryption
Need more help?
Can't find what you're looking for? Our team is here for you.
Contact support
US Datacenter
EU Datacenter
Setup your email signature
An email signature automatically adds your contact details and other important information to the end of your messages. It helps recipients quickly identify who you are, how to contact you, and which organization you represent. A consistent signature also gives your emails a more professional appearance and saves time by removing the need to type the same information repeatedly. Once configured, your signature can be added automatically to new emails, replies, and forwarded messages.
Follow these steps to set up your individual email signature:
1. Sign in to Everymail in your web browser
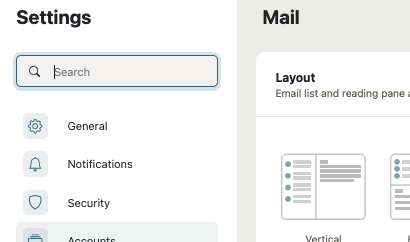
2. Open Settings
Click the **Settings** ⚙️ icon in the top-right corner.
Select **All settings** if the full settings menu is not already displayed.
3. Open the signature settings
Select **Mail**.
Open **Signatures**.
You can also use the search field in the top-left corner to go directly to Mail or
Signatures, then click the relevant result.
4. Create a signature
Click **Add new signature**.
Enter a name for the signature, for example, **Business Signature**.
5. Enter your signature
Add your contact information, for example:
- First name Last name
- Job title
- Phone number
- Email address
- Website
Use the available formatting options to format the signature.
6. Review the signature preview
Check that the signature looks correct in the preview pane.
7. Click Save
8. Set the signature as default
In the **Signatures** settings, select which signature should automatically be used for:
- New messages
- Replies and forwarded messages
If you use more than one email address or mail account, you can configure the appropriate default signature for each address.
9. Test the signature
Open **Mail**.
Click **Compose** to create a new email.
Check that your signature appears correctly.
If necessary, use the signature option in the compose window to select a different signature.