-
The Transition to Everymail
- Why “Free” Email Is Usually Not Free
- Your transition to Everymail
- How can I subscribe to Everymail?
- How does the free trial work?
- Why is my email service being transitioned to Everymail?
- Why do I have to pay for email now?
- What happens if I don't subscribe during the free trial?
- Is my information shared or sold to third parties?
- Can I recover my email data if I don’t subscribe by the end of the subscription period?
- How does Everymail comply with data privacy laws?
- Does Everymail mine my data?
-
My Account
-
Forgot Your Password
-
Everymail on Every Device
-
Advanced Support
-
Everymail on the Web
- How to recognize genuine Everymail emails and avoid phishing
- Everymail on the Web
- Use 2-step Verification to secure your email account
- Downloading your Personal Data
- How to change your login password in webmail
- I can't login
- How do I log in to my email?
- Create a new folder
- Move an email to a folder
- Using search in Mail
- Archiving emails
- Storage Usage
- Mark as Spam/Not Spam
- Delete an email
- Setup your email signature
- Using sort to search
- Mark as Read/Unread
- How to spellcheck emails
- Adjust the size of text
- Enabling Conversations (Visually group all messages with their replies)
- Adjust your location, time zone and language settings
- Automatically save email addresses
- How to Auto forward emails
- Organize your email with folders
- Enter your contact information
-
Billing and Payments
-
Customize Everymail on the Web
- Customize your inbox
- Unified Mail
- Adding an existing email account to Webmail
- Customize your email with themes and backgrounds
- Organize your email using filter rules
- Using Inbox Categories to organize your incoming emails
- Choose your email layout view
- Configure your quick launch icons
- Enable dark-mode
- Customize your portal
-
Address Book
-
Calendar Management
-
Tasks Management
-
Email & File Encryption
Need more help?
Can't find what you're looking for? Our team is here for you.
Contact support
US Datacenter
EU Datacenter
Connect Your Device
Easily get Everymail working on your desktop or mobile phone.
With the Connect your device wizard you can:
-
Install Everymail like an app on your mobile phone
-
Set up Everymail and get your email on any of the following:
-
On your Windows PC or MacOS Computer
-
Outlook, Apple Mail, etc.
-
-
On your Android or iPhone device
-
On your iPad or Android tablet
-
Where to find it

- Log in to Everymail webmail in your browser
- Click the
 Gear Icon in the top right corner
 - Select Connect your device from the menu
Install Everymail as an App
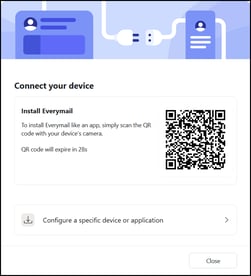
This will open a small window with a QR code square labeled:
Install Everymail
Using this QR code on your device will log you into Everymail on a browser on that device, and provide specific instructions to install Everymail like an app on that device.
⚠️ NOTE: See How to use a QR Code at the end of this article if you’re not familiar.
Set Up Everymail on Your Device
From the Connect your device screen, click Configure a specific device or application 
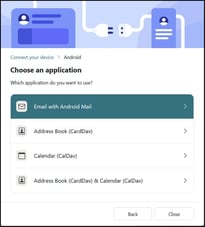
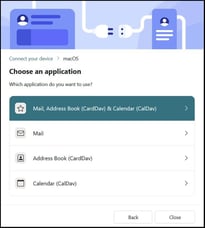
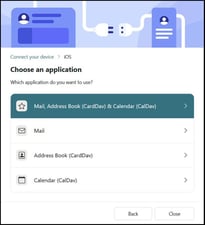
This will bring up a screen where you can select your device type, to get the correct instructions and settings:
 Click the DEVICE you want
-
Windows PC
-
Android phone or tablet
-
macOS
-
iPhone or iPad
then...
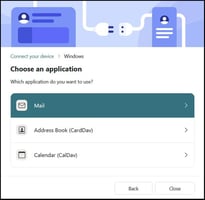
Click the APP you want
-
Mail
-
Calendar
-
Address Book
|
Windows |
Android | MacOS | iPhone | |
|
|
 |
 |
 |
Depending on the device and the service you’re configuring, the options will look a little different, for instance:
-
Setting up email on your iPhone
-
Setting up calendar on your MacOS
-
Etc.
Since each option will give you the next steps to follow, this article doesn’t describe every possible path available, but here is an overview of the most common features.
Using the QR Code
For some devices and applications, like email on iPhone, you will see a QR code that you can scan with your device which will attempt to configure things for you automatically. Below the QR code there is a link you can use if you’re already on your iPhone, and you will also see the option Show manual configuration options.
Manual Configuration
You can setup your Everymail email automatically in most apps (Outlook, iPhone’s Mail app, etc.) simply by entering your email address when the app starts up for the first time, or when using the app’s function to add a new email address.
In most cases, just adding your Everymail email address and then providing your password is all you’ll need to do to get set up.
But in some cases, the app may need you to provide specific settings for manual configuration. If so, Connect your device can provide the correct information for your Everymail account.
How to use a QR Code
A QR Code is a square graphic with a pattern of light and dark squares which contains information that can be read by a computer. You can use the camera on your phone or other device to scan the QR Code, which will pass that information to your device.

-
Load the camera app on your phone or other device (the one you want to set up)
-
Point the camera at the QR code
-
You DON’T need to take a picture
-
You should see a popup in your camera app that you can click:
iPhone![]()
Android![]()
Clicking this will do whatever the QR code is programmed to do, whether that's taking you to a website, or configuring your email app.